Hello and greetings!
I did a guide on this part before but I think I do need to update a bit regarding: How to Adjust Mania Keys in osu!mania
I'll separate them into three steps, mainly:
1.) Identify the elements used in the skin
2.) Edit the skin elements
3.) Adjust the HitPosition in skin.ini
----------------------------------------------------------
You may ask any questions below if you're stuck and need help.
I'll try update this one if there are any changes.
Thanks!
I did a guide on this part before but I think I do need to update a bit regarding: How to Adjust Mania Keys in osu!mania
I'll separate them into three steps, mainly:
1.) Identify the elements used in the skin
2.) Edit the skin elements
3.) Adjust the HitPosition in skin.ini
1.) Identify the elements used in the skin
The first step is to open your selected skin folder - go to options, type skin and find Open current skin folder - then check your skin.ini file.
The skin.ini file is basically like the core of the skin, where if you configure it the skin changes and such. This is really important especially for osu!mania because you will mainly use skin.ini for it. For more information regarding skin.ini, you may refer to this link: osu! skin.ini spreadsheets
In skin.ini, choose key mode do you want to configure. For example, if you focus mainly on 4K, you only need to deal with the following code:
Look for any commands starts with "KeyImage#" and "KeyImage#D" - where # = integers.
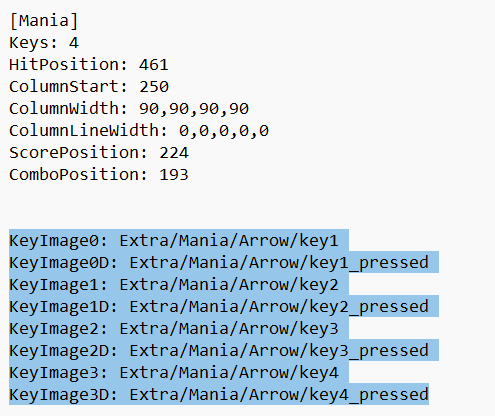
0 represents the 1st key and 3 represents the 4th key; it will always start with 0.
From this screenshot above, it tells the file location of where to find the KeyImages and KeyImagesD.
In visual, you just go to the files in your skin folder and that is what the image is currently been selected for osu!mania skin.
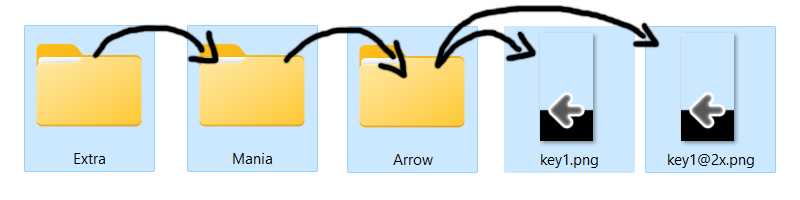
@2x is just the twice size of the original image. It makes it higher quality. That's all.
With all of the files you've found within the file location of both KeyImages and KeyImagesD, these are what you need to edit.
------------------------------------------------------------------------------------------------
WHAT IF I CAN'T FIND KEYIMAGES# AND KEYIMAGES#D?
IF you can't find "KeyImages#" and "KeyImages#D", or simply skin.ini isn't there, the default skin elements used are in the main folder, the following names are:
Other than that, the steps are the same.
The first step is to open your selected skin folder - go to options, type skin and find Open current skin folder - then check your skin.ini file.
The skin.ini file is basically like the core of the skin, where if you configure it the skin changes and such. This is really important especially for osu!mania because you will mainly use skin.ini for it. For more information regarding skin.ini, you may refer to this link: osu! skin.ini spreadsheets
In skin.ini, choose key mode do you want to configure. For example, if you focus mainly on 4K, you only need to deal with the following code:
------------------------------------------------
[Mania] <---- Mania Section
Keys: 4 <---- Shows this is the 4K key mode

xxx
xxx
xxx

//Where xxx = any appropriate commands used

[Mania] <---- YOU DON'T NEED TO CHECK ANYMORE | DIFFERENT SECTION
Keys: 7 <---- This is for 7K, no need to configure if you don't play them
------------------------------------------------
Look for any commands starts with "KeyImage#" and "KeyImage#D" - where # = integers.
0 represents the 1st key and 3 represents the 4th key; it will always start with 0.
From this screenshot above, it tells the file location of where to find the KeyImages and KeyImagesD.
Extra/Mania/Arrow/key1
^     ^     ^     ^
File  File  File  Image
In visual, you just go to the files in your skin folder and that is what the image is currently been selected for osu!mania skin.
@2x is just the twice size of the original image. It makes it higher quality. That's all.
With all of the files you've found within the file location of both KeyImages and KeyImagesD, these are what you need to edit.
------------------------------------------------------------------------------------------------
WHAT IF I CAN'T FIND KEYIMAGES# AND KEYIMAGES#D?
IF you can't find "KeyImages#" and "KeyImages#D", or simply skin.ini isn't there, the default skin elements used are in the main folder, the following names are:
The names.
mania-key1
mania-key1@2x
mania-key2
mania-key2@2x
mania-keyS
mania-keyS@2x
mania-key1D
mania-key1D@2x
mania-key2D
mania-key2D@2x
mania-keySD
mania-keySD@2x
Other than that, the steps are the same.
2.) Edit the skin elements
Launch any Image Editing Software such as Photoshop or GIMP and drag the image in it. Make sure the canvas is the same size as the images you dragged into, otherwise you can just check the sizes and configure the canvas later. For this guide, I'm only going to use "Key1" and "Key1@2x" images.
For the adjustment of the mania keys, you only need to pay attention about the image's height. DO NOT CARE ABOUT THE WIDTH!
Below shows two separate options of how to edit based on its condition:
Note: This may contains trial and error depending how do you want to adjust the height, so be sure to take your time. Also, this works for any other mania keys, but do note that you need to align them based on how many pixels you move them up the same.
Launch any Image Editing Software such as Photoshop or GIMP and drag the image in it. Make sure the canvas is the same size as the images you dragged into, otherwise you can just check the sizes and configure the canvas later. For this guide, I'm only going to use "Key1" and "Key1@2x" images.
For the adjustment of the mania keys, you only need to pay attention about the image's height. DO NOT CARE ABOUT THE WIDTH!
Below shows two separate options of how to edit based on its condition:
For those who have @2x images or both @2x images and its original.
I URGE you to edit @2x first.
So that you can edit the original image easily.
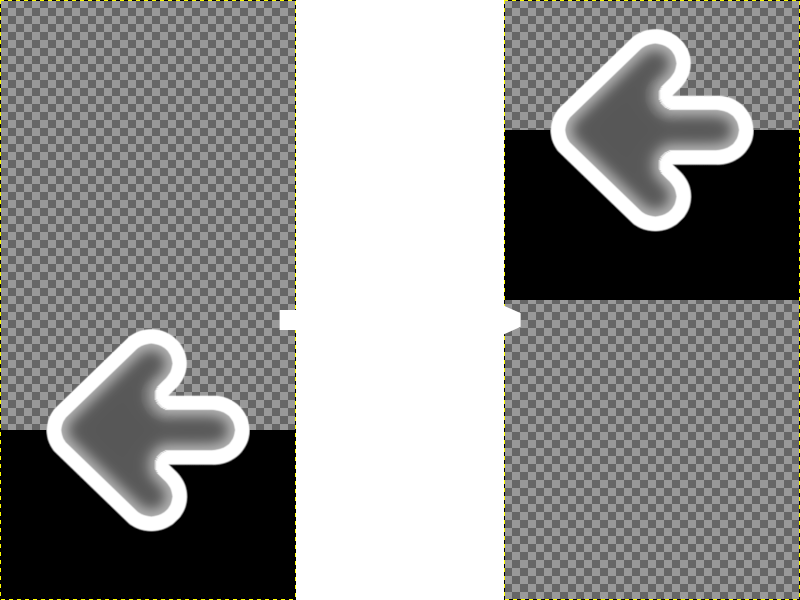
Once the canvas is set to the same size as the image, you need to make sure that you have some blank spaces around its height. Just keep the width the same.
If your image doesn't have any blank canvas, you can then add more to it.
Then, grab the "Move Tool" and move the image upwards like shown below.
Overwrite the image - DON'T CHANGE THE NAME - and replace it on its original location.
After reloading your skin - pressing "Ctrl" + "Alt" + "Shift" + "S" keys altogether, the result should turn like this:


------------------------------------------------------------------------------------------------
ORIGINAL IMAGE
As for the original image, you can just reduce the @2x image by half, as well as erase "@2x".
For example: 296 x 600 pixels -> 148 x 300 pixels. | key1@2x -> key1
So that you can edit the original image easily.
Once the canvas is set to the same size as the image, you need to make sure that you have some blank spaces around its height. Just keep the width the same.
If your image doesn't have any blank canvas, you can then add more to it.
Then, grab the "Move Tool" and move the image upwards like shown below.
Overwrite the image - DON'T CHANGE THE NAME - and replace it on its original location.
After reloading your skin - pressing "Ctrl" + "Alt" + "Shift" + "S" keys altogether, the result should turn like this:
------------------------------------------------------------------------------------------------
ORIGINAL IMAGE
As for the original image, you can just reduce the @2x image by half, as well as erase "@2x".
For example: 296 x 600 pixels -> 148 x 300 pixels. | key1@2x -> key1
For those who only uses the original image. (No @2x)
Once the canvas is set to the same size as the image, you need to make sure that you have some blank spaces around its height. Just keep the width the same.
If your image doesn't have any blank canvas, you can then add more to it.
Then, grab the "Move Tool" and move the image upwards like shown below.
Overwrite the image - DON'T CHANGE THE NAME - and replace it on its original location.
After reloading your skin - pressing "Ctrl" + "Alt" + "Shift" + "S" keys altogether, the result should turn like this:
Note: This may contains trial and error depending how do you want to adjust the height, so be sure to take your time. Also, this works for any other mania keys, but do note that you need to align them based on how many pixels you move them up the same.
3.) Adjust the HitPosition in skin.ini
As stated in the title, you need to adjust the HitPosition with integers - where the higher the value, the lower the judgement line is and vice versa:
Once again, reload the skin and you're good to go!
As stated in the title, you need to adjust the HitPosition with integers - where the higher the value, the lower the judgement line is and vice versa:
------------------------------------------------
[Mania]
Keys: 4

HitPosition: 402 <---- Focus only this one
------------------------------------------------
Once again, reload the skin and you're good to go!
You may ask any questions below if you're stuck and need help.
I'll try update this one if there are any changes.
Thanks!