Introduction
When making mapsets for ranked you might come across the issue that you used whistles for kicks or claps for hi-hats, so you want to change those hitsounds to something that sounds more fitting in the default skin.
Making any changes like this to your whole mapset is a huge ordeal, but luckily Hitsound Studio can make it a breeze!
In this guide I'll guide you through how to use Hitsound Studio to easily make changes to your hitsounds.
Step 1:
Locate your beatmap. For this guide I'll be using the Last Resort mapset by Kroytz, because it uses whistle kicks and also has mania difficulties which make it a bit more complicated.
Note that if the hitsounds for all the difficulties in your set can be copied from a single hitsound diff, this process will be a lot faster. You'll see the difference in the later steps.
Step 2:
Hitsound Studio is part of Mapping Tools. You can download Mapping Tools from the website https://mappingtools.seira.moe/
Then just click the 'Download now' button and go through the installer.

Step 3:
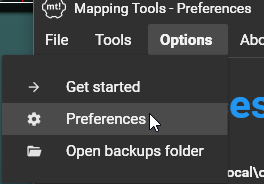
Make sure the osu! folder path and the songs folder path are correctly configured in the Preferences window. This will help make the process quicker later on.

Step 4:
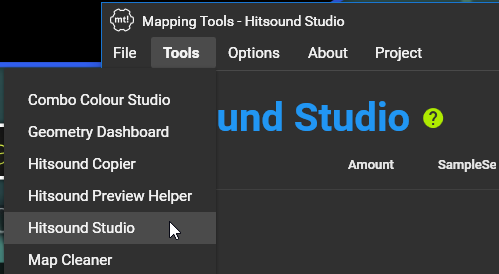
Open Hitsound Studio from the Tools menu. You can click the green question mark button next to the title to get an idea of what Hitsound Studio does.
Step 5:
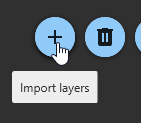
Click this plus button near the bottom right to open the importing window and go the the 'Import hitsounds' tab.

Step 6:
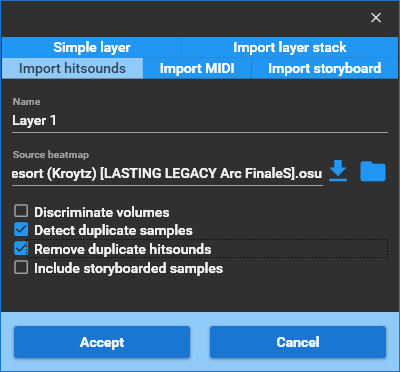
In the 'Source beatmap' field input the path to your hitsounds diff (if you have one) or your most densely hitsounded difficulty. This is the beatmap that Hitsound Studio is going to import all hitsounds from.
You can use the download icon to fetch the current beatmap from your osu! client or the folder icon to browse for your map.
Check the 'Detect duplicate samples' and the 'Remove duplicate hitsounds' checkboxes to optimise the hitsounds.
(if you're importing a mania map that uses the volume property on all notes, then also check the 'Discriminate volumes' checkbox. I will use this later for the mania difficulties of Last Resort.)
Once you got all that click Accept to import the hitsounds.
Step 7:
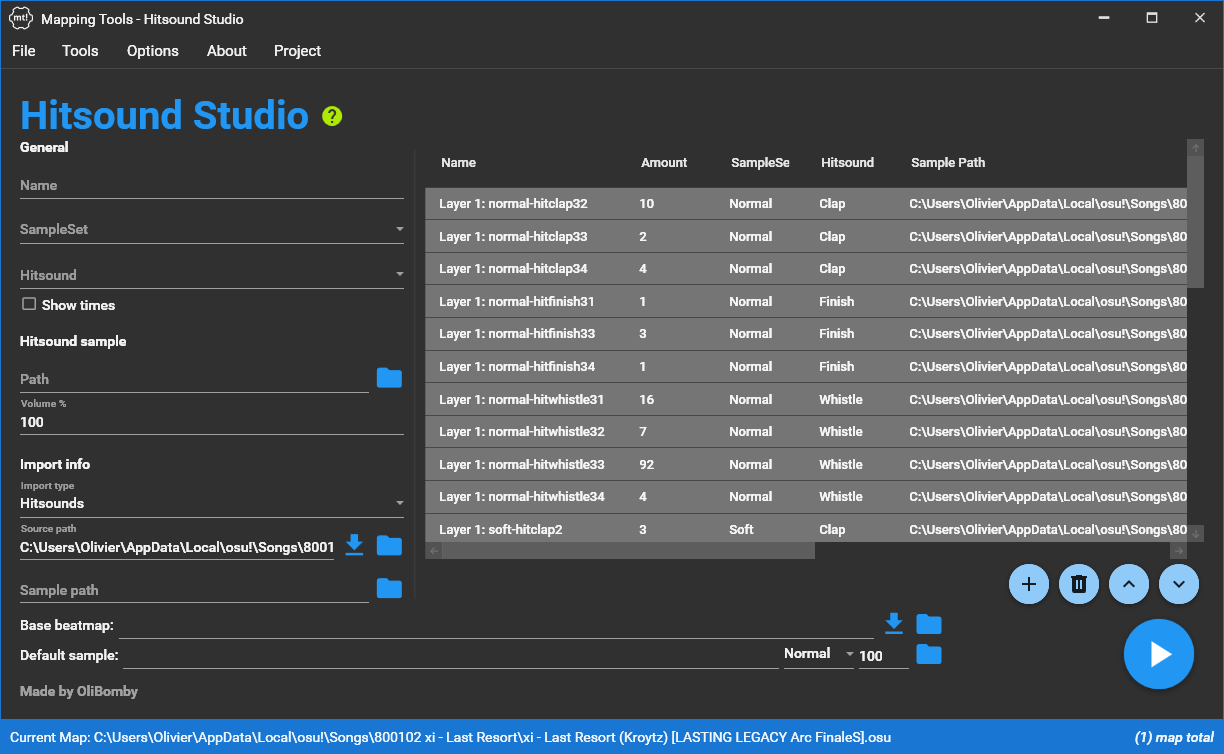
What you have now should look something like this. In the list on the right you can see all the hitsound layers and on the left you can see the properties of all selected hitsound layers. Try selecting a few individual hitsound layers to get a feel for the user interface.
Every hitsound layer has a combination of a sample set, a hitsound, and a audio sample (represented by the path to the file). You can double click any layer to play the sample, so you can use that to check what hitsound layer corresponds to what sound.
In my case, every layer with soft whistle is playing a kick sound.
Step 8:
Now you can change the sample set and hitsound for any layer. Try making it so the combination of sample set and hitsound in the default skin makes a similar sound to the audio sample sound.
I'll change all hitsound layers with kicks to drum normals and change all snares to soft claps.
Make sure to remember exactly how you make these changes for when you have to repeat it to the other difficulties.
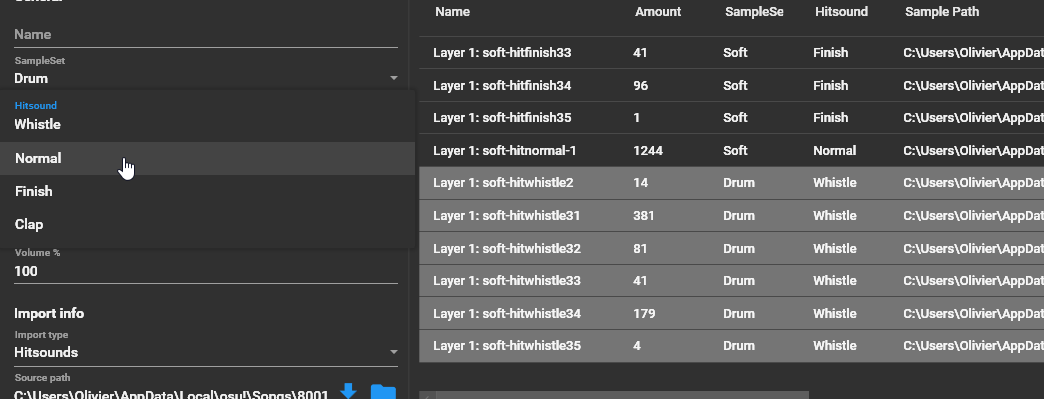
You can also change the order of selected layers with these up and down buttons (hold shift for increments of 10). Layers higher in the list have a higher priority, so when mixing happens the sampleset of the layer with the highest priority will take priority.

Step 9:
Set this 'Base beatmap' field to the same beatmap you imported the hitsounds from. This beatmap will serve as the base for the hitsound diff that is going to be exported.

Step 10:
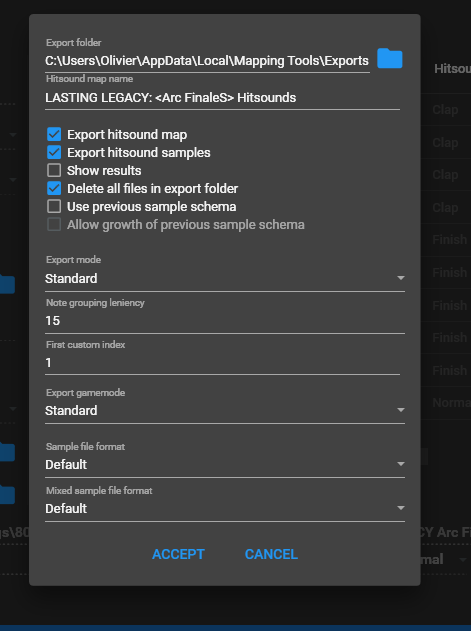
Press the big play button on the bottom right. This will open up a new window with export options.
If this is the first export, you can copy the settings from the figure below.
For the 'Hitsound map name' field make sure to input a unique name. Here I just took the diffname and added 'Hitsounds'.
If you're exporting hitsounds for a mania map, then make sure to set the export mode to 'Coinciding' and the export gamemode to 'Mania'.
Step 11:
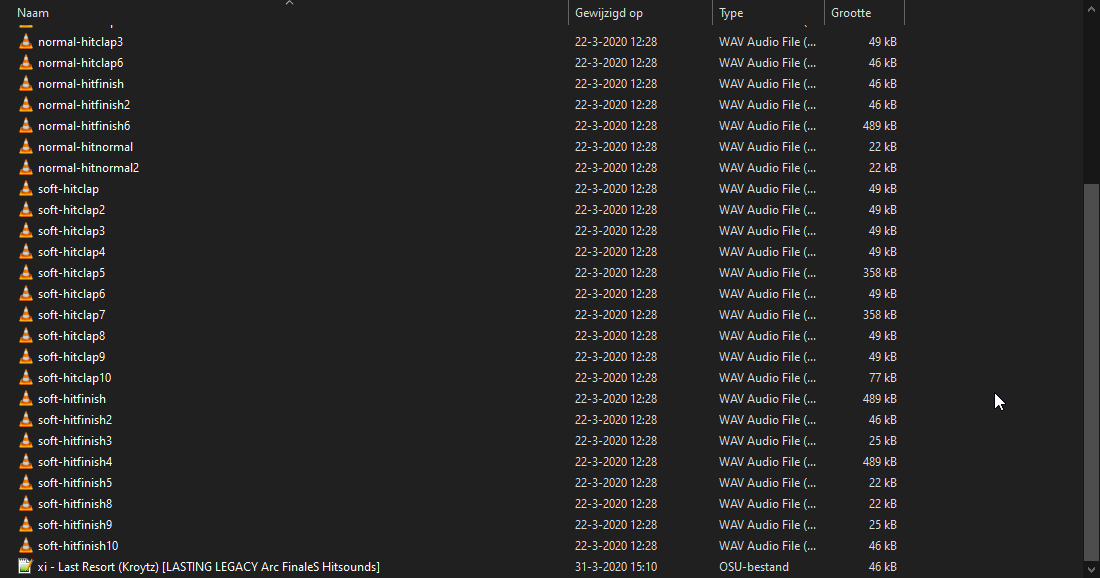
Click accept and let Hitsound Studio do all the work. When it's done it will open up the export folder and show you the exported files.
It includes all the necessary custom samples and the hitsound diff which you can hitsound copy straight to the map you initially used to import hitsounds from.
Step 12:
If all the difficulties in your mapset can use the same hitsounds, then you can skip to step 13. Otherwise you have to remove all your hitsound layers and repeat steps 5-11 for every set of difficulties which use different hitsounds. Doing this for every individual difficulty ensures that you won't overwrite any differences in hitsounds between difficulties.
For the repeated runs make sure you uncheck 'Delete all files in export folder' in the export options, so you don't remove the results of the previous runs. Also make sure to check 'Use previous sample schema' and 'Allow growth of previous sample schema', so the repeated runs re-use the same audio samples.
With the repeated runs I'm going to make one extra hitsound diff for the mania difficulties and one specifically for toybot's diff, so the changes in hitsounds between these difficulties will be respected.
Step 13:
Now that you got all your new samples and new hitsounds it's finally time to transfer them back to your mapset.
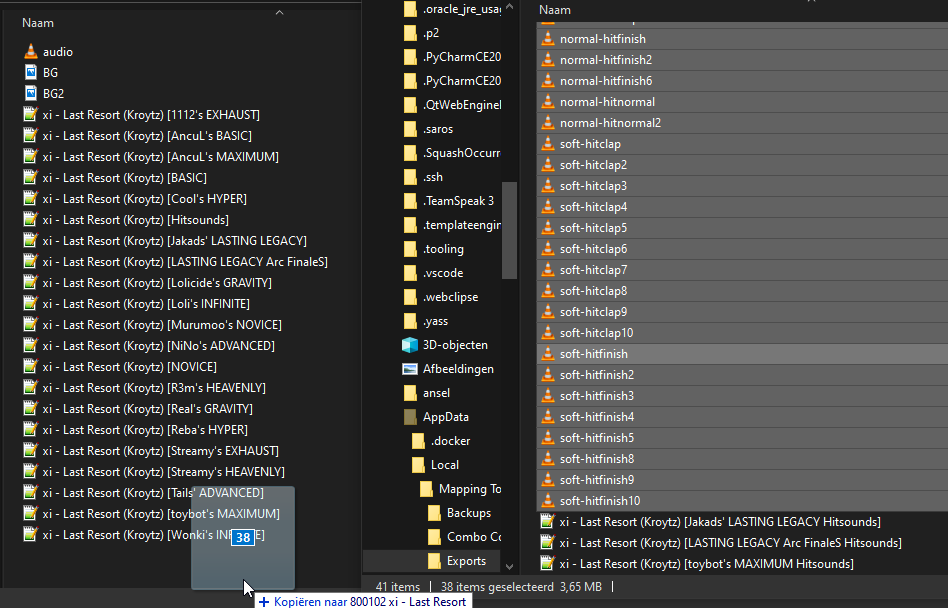
Open the folder of your mapset and remove all hitsound samples and then replace them with the new samples.
Step 14:
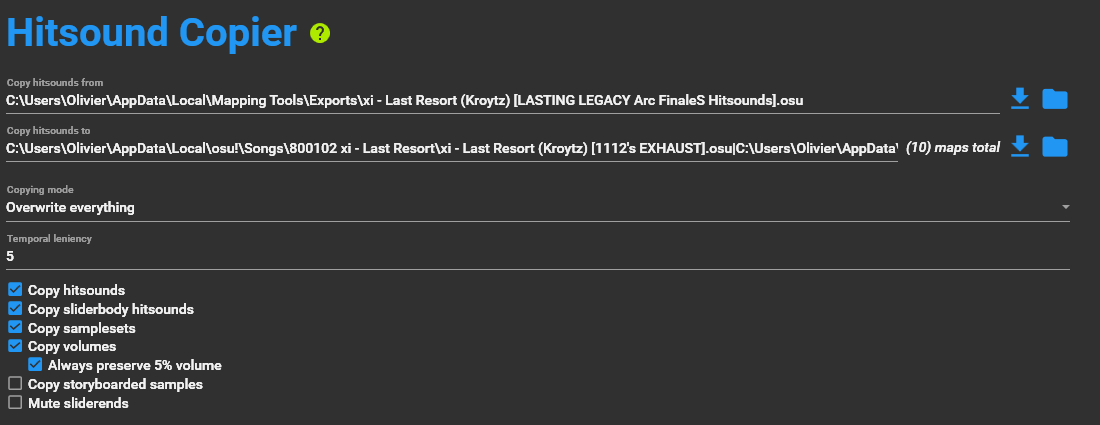
Use the Hitsound Copier (also in Mapping Tools) to copy the hitsounds from the hitsound diffs you created to their corresponding maps.
You can use multi-select in the file browser to copy to multiple difficulties at once.
Step 15:
You're done!
If you still have any questions, you can ask them below and then I'll try answering them.
When making mapsets for ranked you might come across the issue that you used whistles for kicks or claps for hi-hats, so you want to change those hitsounds to something that sounds more fitting in the default skin.
Making any changes like this to your whole mapset is a huge ordeal, but luckily Hitsound Studio can make it a breeze!
In this guide I'll guide you through how to use Hitsound Studio to easily make changes to your hitsounds.
Step 1:
Locate your beatmap. For this guide I'll be using the Last Resort mapset by Kroytz, because it uses whistle kicks and also has mania difficulties which make it a bit more complicated.
Note that if the hitsounds for all the difficulties in your set can be copied from a single hitsound diff, this process will be a lot faster. You'll see the difference in the later steps.
Step 2:
Hitsound Studio is part of Mapping Tools. You can download Mapping Tools from the website https://mappingtools.seira.moe/
Then just click the 'Download now' button and go through the installer.
Step 3:
Make sure the osu! folder path and the songs folder path are correctly configured in the Preferences window. This will help make the process quicker later on.
Step 4:
Open Hitsound Studio from the Tools menu. You can click the green question mark button next to the title to get an idea of what Hitsound Studio does.
Step 5:
Click this plus button near the bottom right to open the importing window and go the the 'Import hitsounds' tab.
Step 6:
In the 'Source beatmap' field input the path to your hitsounds diff (if you have one) or your most densely hitsounded difficulty. This is the beatmap that Hitsound Studio is going to import all hitsounds from.
You can use the download icon to fetch the current beatmap from your osu! client or the folder icon to browse for your map.
Check the 'Detect duplicate samples' and the 'Remove duplicate hitsounds' checkboxes to optimise the hitsounds.
(if you're importing a mania map that uses the volume property on all notes, then also check the 'Discriminate volumes' checkbox. I will use this later for the mania difficulties of Last Resort.)
Once you got all that click Accept to import the hitsounds.
Step 7:
What you have now should look something like this. In the list on the right you can see all the hitsound layers and on the left you can see the properties of all selected hitsound layers. Try selecting a few individual hitsound layers to get a feel for the user interface.
Every hitsound layer has a combination of a sample set, a hitsound, and a audio sample (represented by the path to the file). You can double click any layer to play the sample, so you can use that to check what hitsound layer corresponds to what sound.
In my case, every layer with soft whistle is playing a kick sound.
Step 8:
Now you can change the sample set and hitsound for any layer. Try making it so the combination of sample set and hitsound in the default skin makes a similar sound to the audio sample sound.
I'll change all hitsound layers with kicks to drum normals and change all snares to soft claps.
Make sure to remember exactly how you make these changes for when you have to repeat it to the other difficulties.
You can also change the order of selected layers with these up and down buttons (hold shift for increments of 10). Layers higher in the list have a higher priority, so when mixing happens the sampleset of the layer with the highest priority will take priority.
Step 9:
Set this 'Base beatmap' field to the same beatmap you imported the hitsounds from. This beatmap will serve as the base for the hitsound diff that is going to be exported.
Step 10:
Press the big play button on the bottom right. This will open up a new window with export options.
If this is the first export, you can copy the settings from the figure below.
For the 'Hitsound map name' field make sure to input a unique name. Here I just took the diffname and added 'Hitsounds'.
If you're exporting hitsounds for a mania map, then make sure to set the export mode to 'Coinciding' and the export gamemode to 'Mania'.
Step 11:
Click accept and let Hitsound Studio do all the work. When it's done it will open up the export folder and show you the exported files.
It includes all the necessary custom samples and the hitsound diff which you can hitsound copy straight to the map you initially used to import hitsounds from.
Step 12:
If all the difficulties in your mapset can use the same hitsounds, then you can skip to step 13. Otherwise you have to remove all your hitsound layers and repeat steps 5-11 for every set of difficulties which use different hitsounds. Doing this for every individual difficulty ensures that you won't overwrite any differences in hitsounds between difficulties.
For the repeated runs make sure you uncheck 'Delete all files in export folder' in the export options, so you don't remove the results of the previous runs. Also make sure to check 'Use previous sample schema' and 'Allow growth of previous sample schema', so the repeated runs re-use the same audio samples.
With the repeated runs I'm going to make one extra hitsound diff for the mania difficulties and one specifically for toybot's diff, so the changes in hitsounds between these difficulties will be respected.
Step 13:
Now that you got all your new samples and new hitsounds it's finally time to transfer them back to your mapset.
Open the folder of your mapset and remove all hitsound samples and then replace them with the new samples.
Step 14:
Use the Hitsound Copier (also in Mapping Tools) to copy the hitsounds from the hitsound diffs you created to their corresponding maps.
You can use multi-select in the file browser to copy to multiple difficulties at once.
Step 15:
You're done!
If you still have any questions, you can ask them below and then I'll try answering them.